A broken button and a broken promise
tl;dr:
I “fixed” an Airport Time Capsule by manually “jumping” the reset pins because the reset button broke off. Unfortunately, in macOS 27, the device won't be supported anymore.
I mean, the thing was built in 2008. The only thing that’s survived from 2008 is seemingly, every Toyota, and a troublingly strong real estate market.
First, a primer on Airports. Airports from Apple, the computer company.
Airports in general
I had already gotten my hands on an Airport Express (2nd gen) for a song (I believe $15) through Facebook Marketplace, after watching a Youtube video that explained that getting one of these added Airplay to any speaker with aux-in.
It does what the Youtube video claimed! However, Airplay always had too much latency to feel wonderful. It was slow to start using every time I walked into the kitchen, and it always felt weird to me that the volume would change nearly instantly, but playing and pausing music made you think your phone had only pretended to send a signal to the router.
It would also inexplicably disconnect while playing, while not playing, or start cutting out. If I was actually liking the music, that meant that I would wait another 30 seconds to see if the Airplay destination came back, or if I’d need to unplug it and replug it again. On the other hand, an iOS update added these really neat automatic Airplay suggestions, which hid the slow connection time by predicting that you’d want to set it up. So, not all bad!
Either way, I had experience with setting these things up, which just meant installing the “Airport Utility” app on my phone, and learning how to plug in these infernal things (they’re actually called C7 connectors, or Telefunken connectors) while also holding a paperclip or some other thin tool to click the reset button. I want to know what test setup they had in Cupertino when they were making these things, because either paper clips have become less comfortable, or there’s some trick that I haven’t been let in on, or they’ve all grown a third arm to make the process easier.
These (often) friction-fit bastards are unfortunately, something I’ve come to appreciate recently, because it’s so easy to find spares of them. Most TVs use this exact cord.
Unrelated: Googling “airport express power cord type” got me this reddit post, and upon closer inspection of the setup shown in the picture, I have to admit that it’d make a relatively clean shower speaker system.
Update: I tried out that shower speaker system. The Airport Express “leaked” some noise to the speaker, so you’re brought back to the era when your computer speakers would play that static that made different noises if your computer was doing something particularly demanding. Unless you want a wireless speaker setup that isn’t within arm’s reach, it’s not worth it. A bluetooth speaker on its own does the job fine.
This Airport (Time capsule)
I received it without a power cord. Luckily, I found a replacement in our recycling center’s electronic waste. People throw away a lot of TVs.
Powering the router on, I realized that I would need to reset it to use it on my network, wired or wirelessly. It was still on some old network’s configuration.
Trying to reset the device, I couldn’t seem to get the “reset” behavior, which is shown by a rapidly flashing LED after powering it on and holding the reset button for a couple of seconds.
Googling what might be wrong, I was hinted that sometimes, the reset button breaks off the board. Apparently, it’s soldered to the board, and pressing the reset button applies a force perpendicular to the solder joint, which means that it will break off if you press the button too hard. Sure enough, closer inspection in pressing the reset button revealed that there wasn’t any discernable click. I figure that this was indicative of a broken solder joint, and so this button was toast.
Going about fixing this one
Regular with any of my side projects, there’s a classic “wait a week to do the thing” delay, so that’s what I did.
The first question: How do I open this thing? There’s no screw holes, and while the housing was already bent around the back, by the ethernet ports, playing with a kitchen knife and a screwdriver didn’t seem to pry anything further open. It was time to Google my way out of the problem.
Well, googling told me something that I wasn’t too surprised to hear: this thing was made by Apple after 2006, so there’s a boat load of adhesive covering everything up. What were they trying to make this thing, waterproof?
Adhesive
Speaking of things that play nice with water, I found a hair dryer (Kidding!) that I thought would help me remove the bottom rubber cover. After a half-assed 20 minute go at this, helped with a butter knife, I managed to get one edge of the bottom cover undone, and I left two butter knives under the rubber (so it wouldn’t re-adhere, undoing my progress) and left it for a few days.
With renewed motivation found a bit later, I went at it again. Hair dryer and knife at the ready, I got a bit more done. The hair dryer’s heat seems to spread across the entire bottom rubber cover, making it annoyingly hot to the touch.
However, a bit of curiosity revealed that, heated by the hair dryer or not, once you have enough of the bottom cover loose, slowly ripping it off (with your fist grabbing as much as possible) works like a charm. The adhesive isn’t strong, but the surface area makes it seem much stronger than it is. I managed to get the whole bottom off with only one small tear on one of the sides (thanks to a butter knife’s sharp-ish edge pointing the wrong way), and I probably could have done it a bit quicker if I realized that the hair dryer wasn’t expressly necessary.
I did this final peeling outside, in July, so I suppose the general heat and humidity, and the age of the adhesive might have made this easier.
Once relieved of the grip of the adhesive, I only needed to undo 10 screws, just like the youtube video said. Refreshingly, they’re all the same screw, and they weren’t even too tight, which allowed a small flathead to get these philips heads screws out.
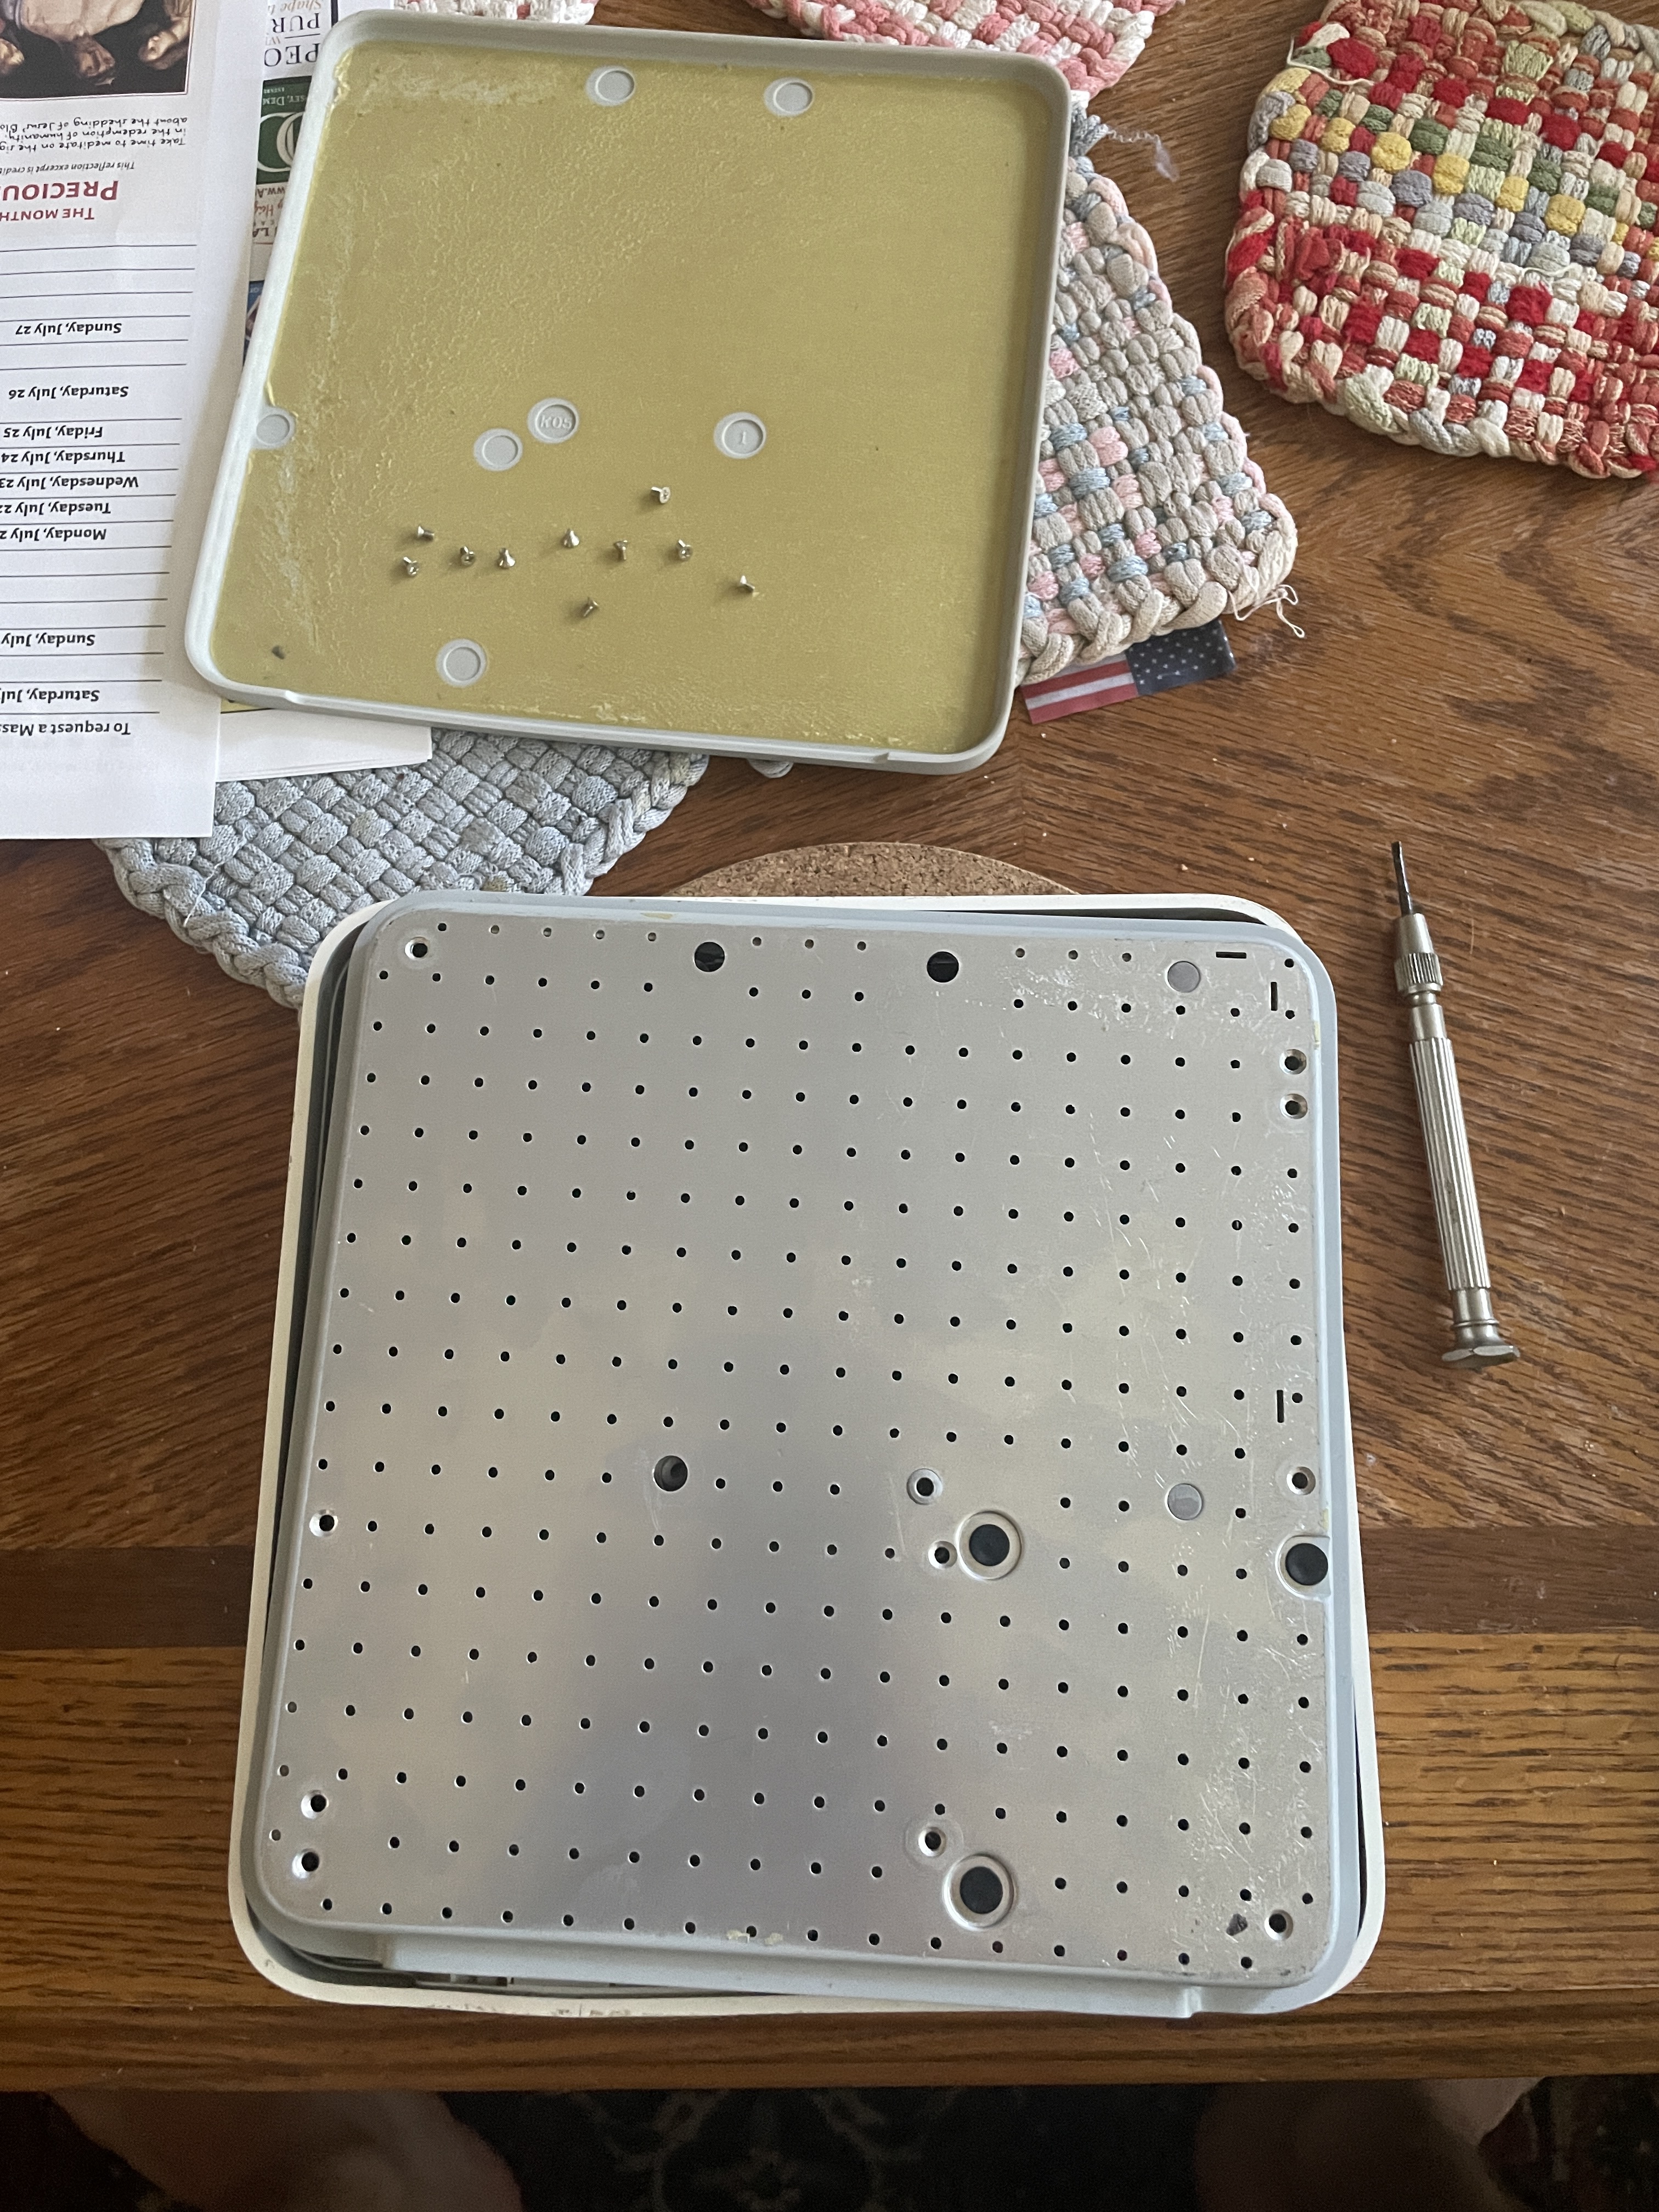
Before removing this plate that I unscrewed, I remembered watching a whole bunch of JerryRigEverything videos and other teardowns, and made sure to be careful removing something, lest there be something on the inside of the removable cover that might rip off. Sure enough, there’s a small fan that probably keeps the power supply from burning up ahdered to the inside of the cover.
I’m in
Taking it apart from here was fun, as the adhesive was gone and I had plenty of access.
I removed the hard drive to get a better look, and put it back after admiring the receipt-printer quality of the (admittedly neat) Apple logo printed on this 1TB WD Caviar Black drive.
Then, I poke at the power supply, before realizing that it’s barely “sealed”, and that power supplies (and those fun little capacitors) are dangerous little things should you touch one by accident.
Finally, I look at what I came here for. I observe (and break) (what’s left of) the reset button that was bent out of place. See the image:
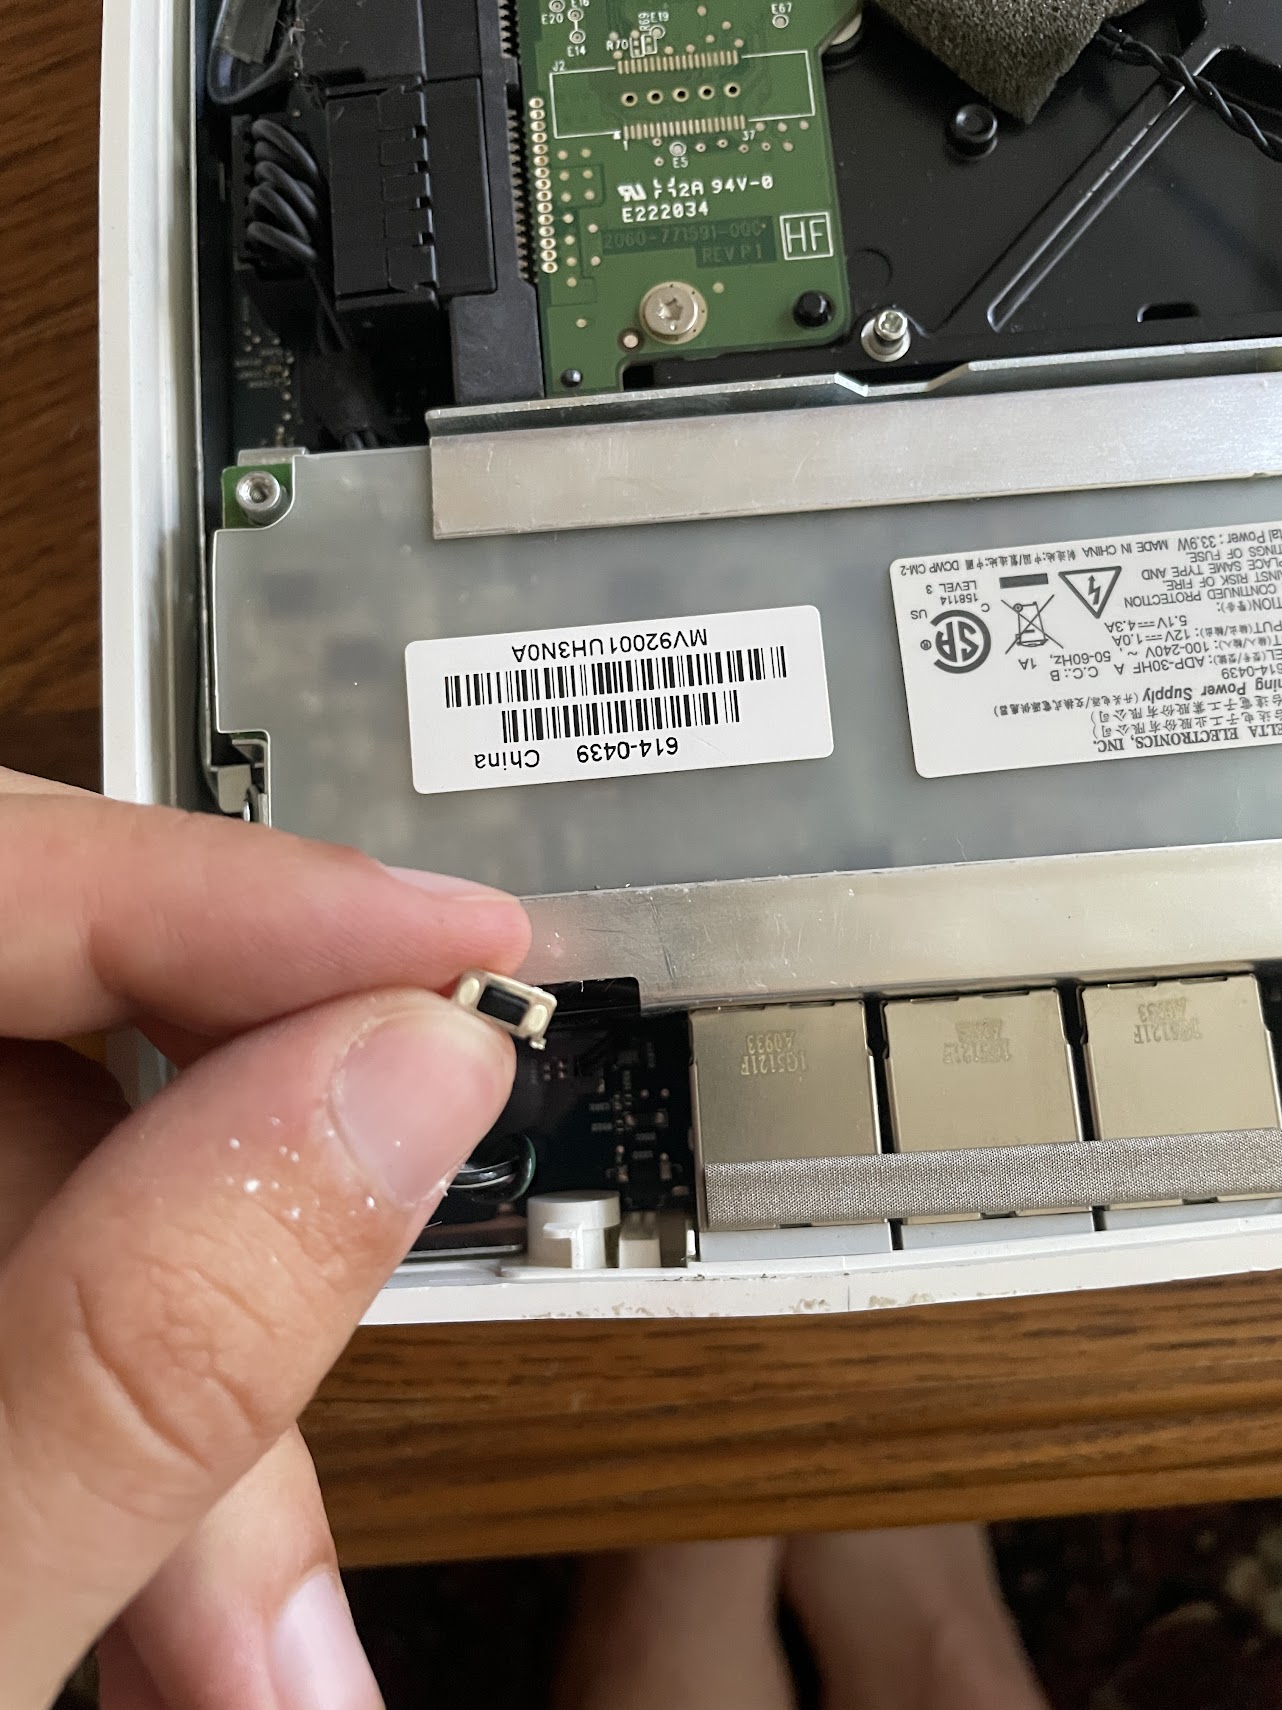
I’m still determined to get this thing working. Given that I haven’t any soldering tools, or soldering experience, putting the reset switch back isn’t in the playbook. The next best thing is to pretend to be the reset switch, by jumping the right connections on the motherboard where the switch was attached.
While I didn’t have a soldering tool, I did have a multimeter. With a little bit of ChatGPT help, I figure out which setting it’s supposed to be tuned to for this use case. I was told to “Switch to 200ohms and poke and prod until the readout goes from 1.0 to “not that”. Anything markedly less than 1 (0.3, 0.5) will be referred to as “not that”, and indicates that there is an electrical connection between the two multimeter tips.
Touching the multimeter’s tongs together did that, and touching certain combinations of the Airport’s reset pins also did that. The goal is actually to find a pair that doesn’t display “not that”, as these pins are likely “waiting” for the (long since, unceremoniously removed) reset button to bridge this pair.
It’s probably “best practice” to poke and prod when the router is off and unplugged, but I managed to survive, and tell the tale that no, doing that didn’t blow up my thing.
Sometimes the “not that” measurement varied, and went from 0.15 to 0.16 after the power-up sequence finished, and it stopped running the fan at full tilt. I could imagine that some “global” power resistance (that’s what ohms measures) probably shifted with something no longer drawing current.

The biggest difficulty of the process was holding the multimeter tongs on the pads. The reset button is nestled in between an ethernet jack, and the plastic that would hold a Kensington lock “firmly” to the plastic frame of the device. The tongs don’t have a lot of space to come from any angle other than top-down.
As if this wasn’t so hard, the reset process only checks the reset pin right after the device is plugged in, so I had to somehow hold these multimeter tongs on the right pads while plugging in the power cord.
Being a normal human being with two hands, the two multimeter tongs were taking up my limited supply of opposable thumbs, so I couldn’t plug in the cursed C7 power adapter into the back of the airport while holding the multimeter right.
But, I found a tool that could help me out - a smart outlet. In this case, a Wemo Mini.
Ironically, I another old and about-to-be-kneecapped-by-manufacturer product could help me fix this one.
The “smarts” of it aren’t particularly useful, but the physical on-off button was.
Wiggling in a friction-fit power connector is difficult using your third hand, but clicking the toe-sized on-off button with your toe isn’t terribly difficult.
I could have toe-clicked the on-off switch on the surge protector (that was right there), but that would have meant unplugging some other stuff that I couldn’t have been bothered to unplug at the time. The smart outlet meant I was only affecting one outlet at a time.
Bridging the two leftmost pins (when looking at the airport from the ethernet port side facing you) worked for me. The multimeter was left in 200ohm mode the whole time.
Finally, success.
Once it was reset, these Apple routers are very easy to configure. I wiped the drive, and it was ready to use.
Thoughts
It (probably) makes for a decent NAS! It’s just a shame that the writing’s already on the wall. I suppose that getting inside again to physically extract the hard drive, or even just copying the contents to a new location wouldn’t be too hard in two years time, when macOS 27 would presumably come out.
Would my M1 Macbook Air be compatible? More importantly, would it be smart to update my laptop’s software, given that a new release is bound to just add cruft and slow it down? Will “Time Machine” backups be transferrable to something else come then? These are all hypotheticals I can’t be bothered to answer now.
I’m just happy that I got to explore, experiment, and (in a rare display,) come out with a functioning piece of hardware after all that.
Update 7-28
I unplugged the thing. I had left it in my room, and the hard drive spinning was an annoying noise that I didn’t want to hear.